
Package a uni-app iOS app offline on Windows, no cloud build queue
This tutorial packages a uni-app project as an iOS app locally on Windows, from exporting an Xcode project and running it on your iPhone to building an .ipa and uploading it to App Store Connect. It’s for developers who already build uni-app projects in HBuilderX and want to stop waiting in the cloud build queue. You need an Apple Developer account, an iPhone and a cable, and KXBuild installed. The first run-through takes about an hour. After that, each rebuild takes a few minutes.
Why package locally
HBuilderX cloud packaging saves you from setting up Xcode yourself, but once a project gets into frequent debugging, a few things start to hurt.
- At peak times there’s a queue. A build can take a few minutes or much longer.
- Cloud packaging has a usage limit, which is easy to hit when you’re debugging native features.
- Every change to the native settings in manifest.json, such as permission descriptions, modules or icons, means building a new custom base (custom debug runtime) or release package.
Local packaging moves this step back to your own PC. DCloud’s official offline packaging requires Xcode on a Mac. With KXBuild you do the same on Windows. Exporting, building, installing and producing the .ipa all happen on your machine, and there’s no queue no matter how many times you build.
Get the offline SDK and AppKey
Download the iOS offline SDK
Download the SDK from DCloud’s iOS offline SDK download page and unzip it. The root folder contains the HBuilder-Hello and SDK folders and a uniapp.podspec file. This root folder is what you select when exporting, for example D:\sdk\HBuilder-iOS-SDK. KXBuild supports offline SDKs for HBuilderX 5.13 and later, which integrate native modules with CocoaPods.
The SDK version must match your HBuilderX version. If they differ, the app reports a version mismatch or shows a blank white screen after launch. Whenever you update HBuilderX, get the new SDK too.
Get an offline packaging AppKey
The DCloud offline SDK checks the AppKey at launch. Without it, the app shows an AppKey error as soon as it opens. The AppKey is tied to the bundle ID, so decide on the app’s bundle ID first (for example com.example.myapp). It must also match the App ID you register in the Apple Developer account.
Sign in to the DCloud developer center at dev.dcloud.net.cn. Under “我的应用” (My apps), open this uni-app app, go to “各平台信息” (platform info), add the iOS platform and enter the bundle ID. After saving, you can view the offline packaging key.
Register the App ID in your Apple Developer account
Sign in at developer.apple.com and create an App ID under Identifiers in Certificates, Identifiers & Profiles, using the same bundle ID as above. If the app uses push notifications, Sign in with Apple, associated domains or similar, check the matching capabilities here so that provisioning profiles you create later include those entitlements. The iOS capabilities declared in manifest.json are written to the project’s entitlements on export, so the two must agree.
Configure manifest.json in HBuilderX
Export reads the app settings from manifest.json. Set the items below in HBuilderX’s visual editor, and every export picks them up.
- App name, version name and version code. The version code must be higher than the last one on every upload to App Store Connect.
- Under “App 图标配置” (app icon settings), generate all iOS icons from one 1024×1024 image.
- Under “App 权限配置” (app permission settings), fill in the iOS privacy usage descriptions. They’re required whenever you use the camera, photos or location. Without them the app crashes when it calls those features, and App Review rejects it.
- Under “App 模块配置” (app module settings), check the modules you use, such as payments, push or maps, and fill in their parameters. Export installs the matching SDK libraries with CocoaPods.
Export the Xcode project
Export first has HBuilderX compile the pages, then generates an Xcode project together with the offline SDK. Open HBuilderX before exporting and it’s found automatically. When HBuilderX isn’t running, its folder or a shortcut to it on the desktop also works. Otherwise pass the install folder with –hbx on the command line. HBuilderX must be signed in to a DCloud account to compile the pages, and the AppID in manifest.json must have been obtained under “基础配置” (basic settings).
For Vue 2 projects, HBuilderX can’t be installed in a folder whose path contains parentheses, such as C:\Program Files (x86)\HBuilderX. This is a limit of HBuilderX’s own compiler plugin. Move the whole HBuilderX folder to a path like D:\HBuilderX, or switch the project to Vue 3 in manifest.json.
Use either of these.
Export with the VS Code extension
Press Ctrl+Shift+P to open the Command Palette and run KXBuild: Import uni-app Project. Select the uni-app project folder (the one containing manifest.json), the offline SDK root folder and the output folder, then enter the bundle ID and DCloud App Key. The export runs in the terminal. When it finishes, open the output folder in VS Code.
Export from the command line
1uniapp2xcode --project D:\work\myuniapp --sdk D:\sdk\HBuilder-iOS-SDK --output D:\work\myuniapp-ios --bundle-id com.example.myapp --dcloud-appkey YOUR_APPKEY --clean
–clean empties the output folder before exporting and is required when the output folder already exists. For other options, such as –display-name, –version-name and –team-id, see the uniapp2xcode command reference. After export the project is at D:\work\myuniapp-ios\HBuilder-Hello\HBuilder-Hello.xcworkspace. Open D:\work\myuniapp-ios in VS Code with File > Open Folder….
Store the bundle ID and AppKey in the uni-app project
Entering the bundle ID and AppKey on every export gets tedious. Create nativeResources\ios\Info.plist in the uni-app project with the CFBundleIdentifier and dcloud_appkey keys. After that you can leave both blank when exporting, and the extension and the command line read them from this file. Any other keys in this Info.plist are also merged into the iOS project’s Info.plist on every export.
 1<?xml version="1.0" encoding="UTF-8"?>
 2<!DOCTYPE plist PUBLIC "-//Apple//DTD PLIST 1.0//EN" "http://www.apple.com/DTDs/PropertyList-1.0.dtd">
 3<plist version="1.0">
 4<dict>
 5  <key>CFBundleIdentifier</key>
 6  <string>com.example.myapp</string>
 7  <key>dcloud_appkey</key>
 8  <string>YOUR_APPKEY</string>
 9</dict>
10</plist>
You can open this file in VS Code, where the KXBuild Property List Editor shows and edits it as a table.
Run doctor
Before the first build after exporting, run doctor. It checks the build environment and fixes anything missing. Use either of these.
- VS Code extension. In the title bar of the KXBuild view, open the “···” menu and run “Doctor (fix environment)”.
- Command line. Run the command below.
1kxbuild doctor D:\work\myuniapp-ios\HBuilder-Hello\HBuilder-Hello.xcworkspace
Check the icons
After export the app icons are in HBuilder-Hello\HBuilder\Images.xcassets. In the VS Code Explorer, right-click this .xcassets folder and choose “KXBuild: Open Asset Catalog” to see whether every icon size is there. Click “KXBuild: Compile-check Asset Catalog” in the title bar, and problems such as missing sizes or an App Store icon with an alpha channel are listed in the Problems panel.
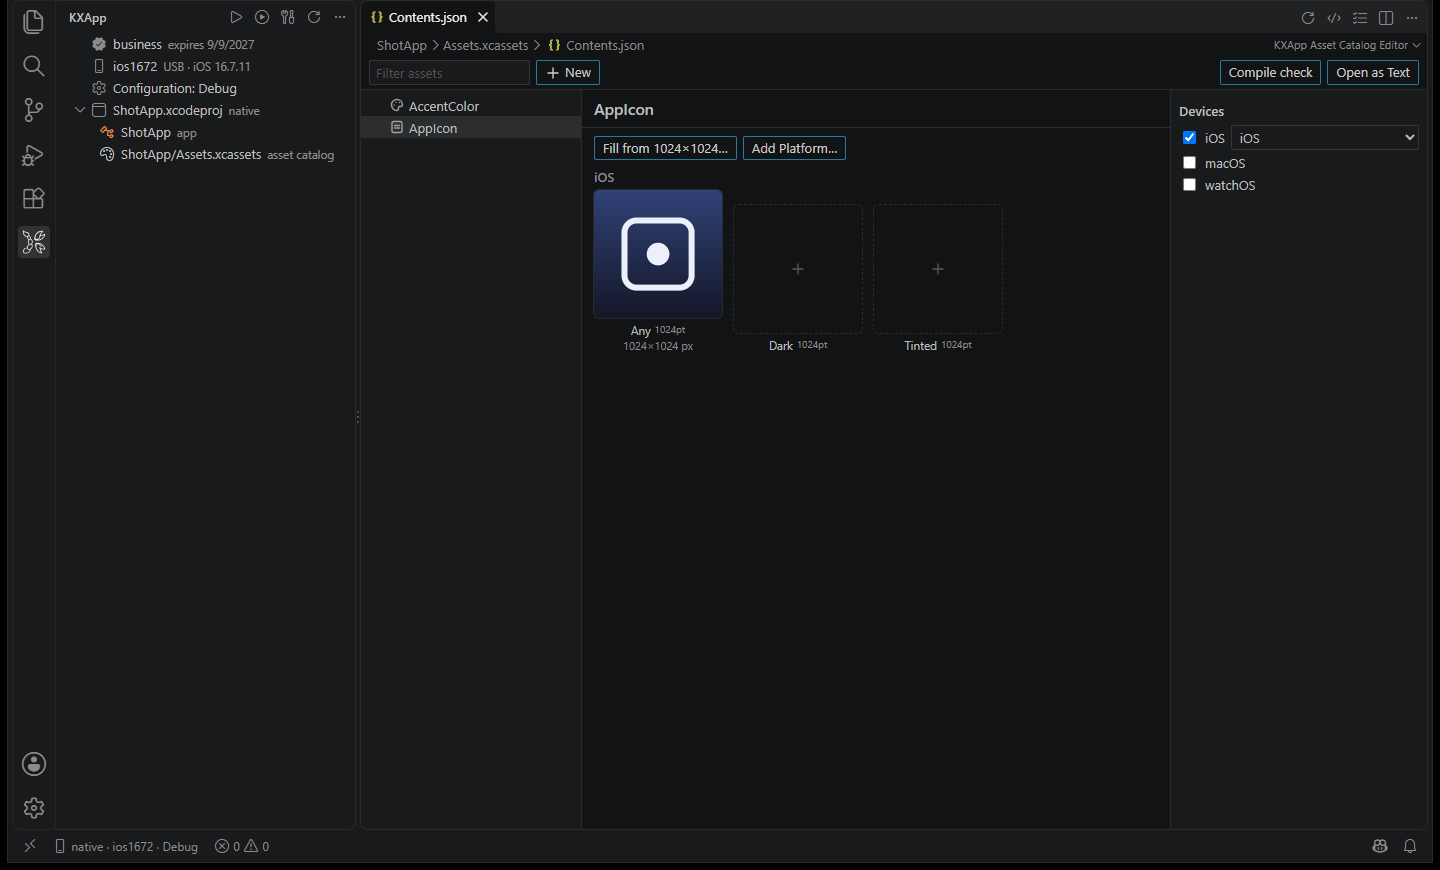
To change the icons, go back to “App 图标配置” (app icon settings) in HBuilderX and export again. Changes made directly in the output folder are overwritten the next time you export with –clean.
Connect your iPhone and run the app
Running on a device requires signing. First create an Apple Development certificate and a Development provisioning profile that includes this iPhone in your Apple Developer account, and put the .p12 and .mobileprovision in the keychain folder. See Certificates and signing.
Connect the iPhone with the cable. On the first connection, if the device node in the KXBuild view says “click to set up”, click it to install the device drivers. Unlock the phone and tap Trust This Computer, then turn on Developer Mode in Settings > Privacy & Security > Developer Mode. The phone restarts once. See Set up your device for details.
Select the iPhone in the KXBuild view and press F5. KXBuild builds, signs, installs and launches the app. Once it’s open on the phone, you can set breakpoints in the native layer in VS Code and debug page JS with the tools built into HBuilderX. The two work independently. The first time you debug a given iOS version, device symbols (several GB) download automatically, only once.
Update the app after changing front-end code
Keep writing pages, styles and JS in HBuilderX as usual. The exported iOS project contains the compiled pages, so after changing code you export again to bring the change into the app. If export finds the source newer than the last compiled output, it recompiles the pages automatically.
- Run the export again. With the extension, run KXBuild: Import uni-app Project again. On the command line, run the same uniapp2xcode command again.
- Go back to VS Code and press F5.
Native settings in manifest.json (permission descriptions, modules, icons, version) work the same way. Export again. There’s no custom base to rebuild and no cloud build to wait for. Here’s what each kind of change needs.
| What changed | What to do |
|---|---|
| Pages, styles, JS | Export again, press F5 |
| Native settings in manifest.json | Export again, press F5 |
| nativeResources\ios\Info.plist | Export again, press F5 |
| HBuilderX was updated | Get the offline SDK of the same version, export again, press F5 |
Exporting again empties the output folder, so don’t edit files in the output folder by hand. Keep any settings you need in the uni-app project’s manifest.json or nativeResources.
Build the .ipa and submit to the App Store
Before submitting, prepare three things. An Apple Distribution certificate and an App Store provisioning profile from your Apple Developer account, both in the keychain folder. And the app record in App Store Connect, with the same bundle ID as the project.
Increase the version code in HBuilderX, export again, then build with the Release configuration. Use either of these.
- VS Code extension. Switch the Build configuration node in the KXBuild view to Release, then run KXBuild: Build from the Command Palette.
- Command line. Run the command below.
1kxbuild build D:\work\myuniapp-ios\HBuilder-Hello\HBuilder-Hello.xcworkspace -s HBuilder -c Release
When the build finishes, the build folder in the project folder contains the .ipa ready to upload. If the Release configuration doesn’t specify an Apple Distribution certificate, add -D CODE_SIGN_IDENTITY=“Apple Distribution” on the command line to override it.
On Windows, sign in to your developer account in Appuploader and upload the .ipa. Once Apple has processed it, it appears on the TestFlight tab in App Store Connect. Install it on your own phone to check it, then select the build on the App Store tab and submit it for review. See Release and App Store submission for the full steps.
FAQ
The app shows an AppKey error as soon as it opens
Either no AppKey was provided at export, or the bundle ID you entered when requesting the AppKey doesn’t match the project. Check the iOS package name in the DCloud developer center and export again.
Version mismatch or blank white screen after launch
The offline SDK and HBuilderX versions differ. Download the SDK that matches your current HBuilderX and export again.
Export says HBuilderX can’t be found
Open HBuilderX, then export again. If it still can’t be found, add –hbx on the command line with the HBuilderX install folder, the one that contains cli.exe.
Export says you’re not signed in or the AppID doesn’t exist
HBuilderX has to be signed in to a DCloud account to compile the pages. Sign in to HBuilderX, open “基础配置” (basic settings) in manifest.json, click “获取” (get) or “重新获取” (get again) next to the AppID, then export again.
Export reports skipped modules at the end
The current offline SDK doesn’t include the module, or the module’s libraries can’t be linked. For example, face verification in the 5.26 SDK is missing a library it depends on. The other modules are packaged as usual. Skipped modules have to wait for DCloud to release a fixed SDK.
The app crashes when opening the camera or photos
Info.plist is missing the matching privacy description. Add the iOS privacy usage descriptions under “App 权限配置” (app permission settings) in HBuilderX, or put them in nativeResources\ios\Info.plist, then export again.
Installing on the phone fails
It’s usually a signing problem. The provisioning profile doesn’t include this phone’s UDID, or the certificate type is wrong. Check with Certificates and signing. For other errors, see Troubleshooting.